Wednesday, October 21, 2020

CYLINDRICAL PLASTIC WIRE MESH HANGER FOR ORCHIDS.

In my last blog I stressed that orchiddist should stop using fern roots to attach their orchids. This is because fern roots are classified under Appendix 1 in CITES. I also showed an alternative using PVC pipes with holes drilled in it . However I have been experimenting with plastic coated wire mesh 1"x 1/2" or 1/2 inch x 1/2 inch mesh and found that iis is better than PVC. Using plastic wire mesh is a cheaper alternative then PVC pipes, lighter in weight and provides more efficient dispensation of moisture and fertilizer.


The mesh comes in 3 ft or 4 ft width but I prefer the 3 foot ones as its easier to handle. I normally make cylindrical shapes of around 2 1/2 to 3 inch in diameter. To get this size I measure 8 inch and cut down the whole length of 3 feet. I then cut them again to get 2 pieces of 11 inch and 1 piece of 12 inch long mesh. 


Using a 21/2 inch pipe (10 inch long) as a mould  I roll the mesh into a cylindrical shape and attached the ends together with the extra wire at its end. I overlap one square and attached the end to secure it.


The Next step is secure a thicker plastic coated wire at the top of the cylinder with one end bent to form a hook.

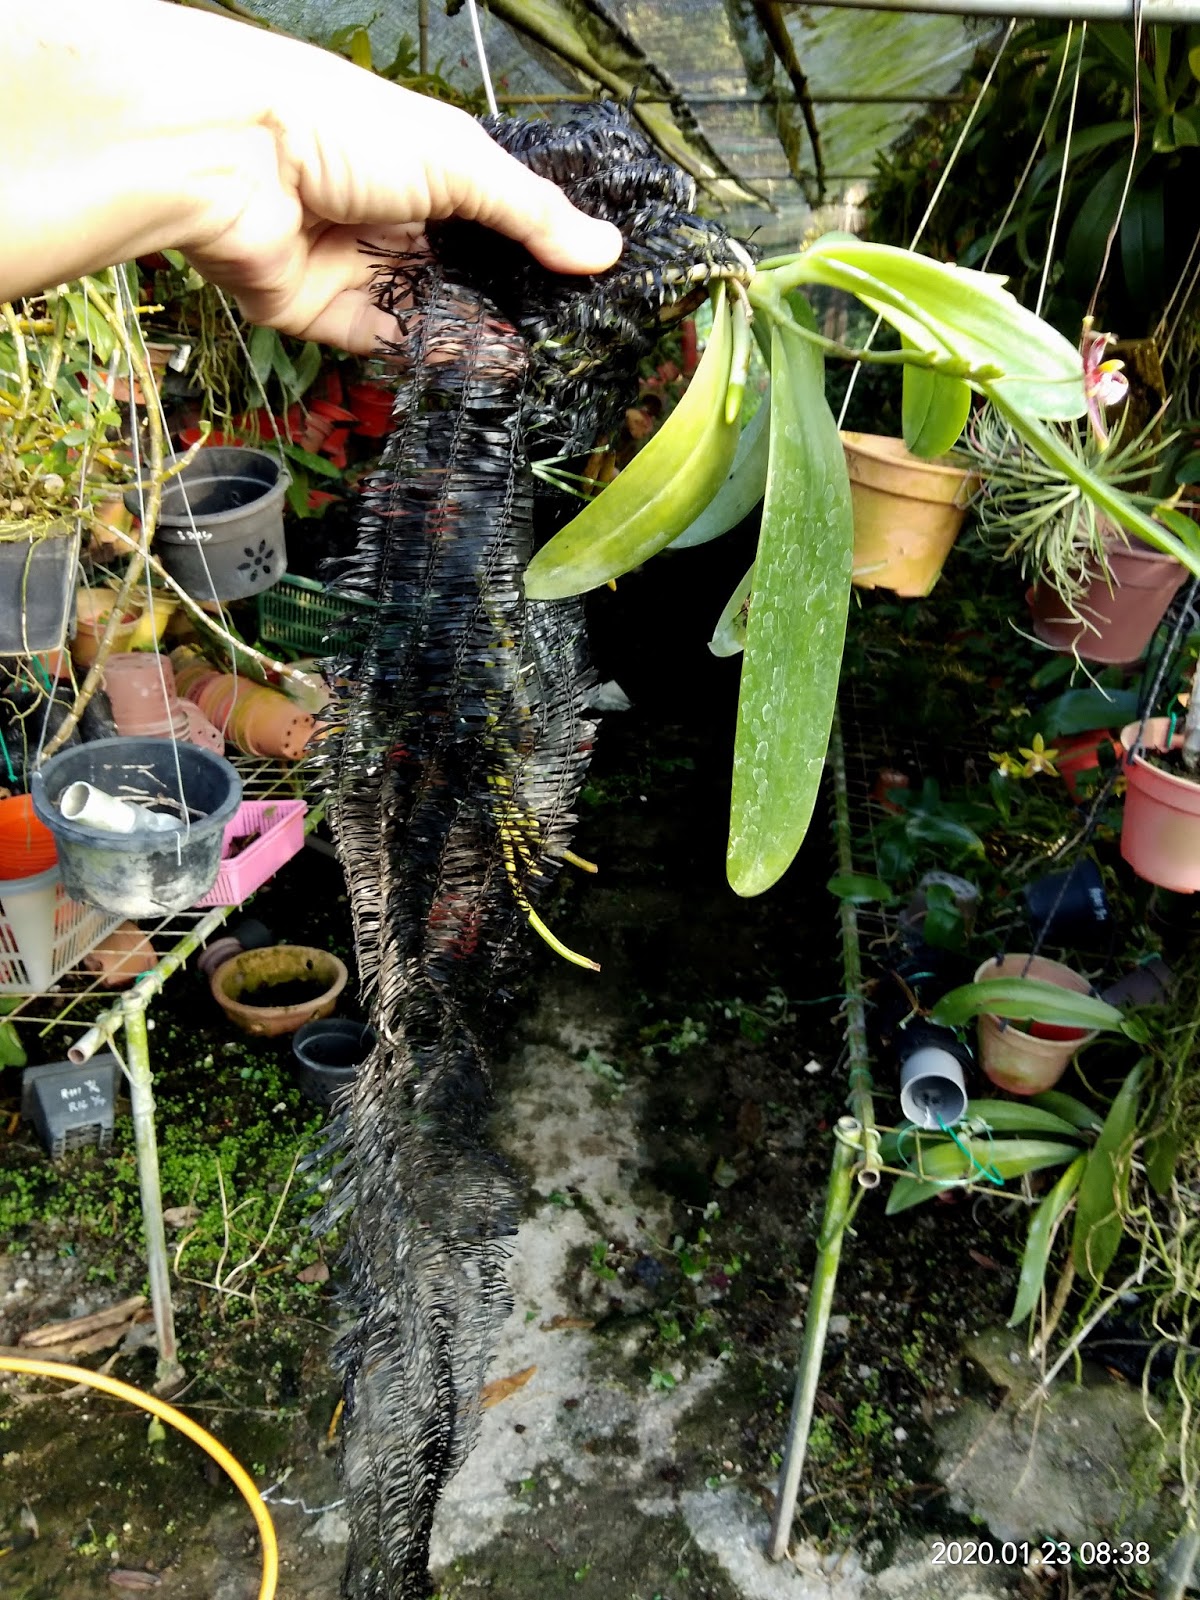
Next step is to wrap some black plastic netting to the cylindrical wire mesh. I wrap it 3 to 4 times depending on the percentage of the netting. ie 50% I wrap 4 times and 70% I wrap 3 times. I normally cut an extra 6 inch at its end so that I can tuck it under the cylinder. The net is secured with string or fine wire.


After this final stage I will add some more netting or moss into the cylinder to allow moisture to be retained in the cylinder. After tying the orchid I wait until the roots are established before I add slow release fertilizer, slow release fertilizer stick or organic fertilizer on top of the cylinder.
Hope this procedure is clear and if you you have any queries please don't hesitate to contact me  for further clarifications

Wednesday, August 12, 2020

What do you do when you receive a catasetum by courier after 7 days

It is crucial that a buyer knows what to do when he receives an orchid from the post which has been delayed for a few days. If it is not treated properly the plant will probably die and then there will be resentment and maybe anger if the plant dies. Catasetums are extremely hardly plant and easy to grow. As long as the bulb is not soft and rotted it will grow new plants.
In the first 2 photographs you can see that the roots are all dried and this is because the plant has to be dehydrated first and then sent bare rooted.


Many people will immediately plant it in a pot and water immediately to hydrate the plant. New roots may grow but more often than not the bulb will rot. I will advise to first cut off all the roots as they are all dried and will not grow again.

After cutting off all the roots, carefully separate all the bulbs. Instead of one plant I have three.
The bulb that still has leaves must also have its leaves cut off .
The bulbs are then tied to hang vertically with a string or wire.
 I normally hang the tied bulbs under my pots and will water and fertilize with my other plants. After some time new plants will emerge from the side with new roots. Once the roots are long enough I will plant them in coco chips or charcoal. 

Friday, January 24, 2020

Tying your orchids to PVC pipes

Tying an orchid to a PVC Pipe

In my last post I showed how to prepare a length of PVC pipe to be used as an alternative for fern root slabs.
The orchids I normally tie to these pipes are phalaenopsis although others like catasetums, dendrobiums, and smaller orchids can also be tied in this manner.
The dead roots of the orchid plant must be cut off leaving only the healthy roots. 

There are many ways to tie your plant. some will like to tie them with the roots facing up and the plants facing down.The reason is that water will not collect on the leaves of the plant
For me I like to tie the plant on the top of the pipe with the roots facing down. The plant will look more natural and the roots which follows the gravity force will grown downwards. I use a plastic string to attach it in place and then tie the roots down as close to the netting on the PVC pipe as possible.


 After securing the whole plant with the plastic string, a piece of netting 3-4 inch wide is used to further cover the roots and keep them as tight as possible to the PVC pipe.
The end of the net is then secured with a piece of wire to ensure that it will keep the net in place . 

 Once this is completed, the whole plant is immersed in a pail of water to ensure that the moss inside the pipe is damp. Water once or twice daily depending on the weather. Dip in a pail of fertiliser mix weekly to ensure healthy growth.
Happy planting

Thursday, July 25, 2019

PVC PIPE FOR ATTACHING YOUR ORCHIDS

PVC PIPE FOR MOUNTING YOUR ORCHIDS

I saw my friend in KL using PVC pipes to mount his orchids and I thought it was an ingenious way to grow orchids. It is simple to construct and it will replace the use of fern roots which is classified as Appendix 1 under CITES. I saw how  he constructed the pipes and I improved on it, making it more effective.
I use different diameter PVC pipes ranging from 1 inch to 3 inches depending on what type of orchids you want to mount. For miniature orchids I normally use a 1 inch PVC pipe, whereas for larger plants like phalaenopsis i will use a bigger diameter. 
The length of the pipe also depends on the type of orchids you want to mount. For bulbophyllum, I will use longer pipes as the plant tend to overgrow the pipe if its too short. For non-climbers I use shorter lengths. This range from 10 inches to 2 feet long.  After some experience you will know what lengths to use. A longer pipe might not harm the orchid but will take up additional space and increase the cost.


 STEP 1
I drill a small hole half an inch from the top so that a 6 inch length wire can be fixed to it  with the other end bent as a hook as show in photograph

STEP2
I use a drill with a special bit to make some holes in the pipe opposite the wire hanger. 1/4 to 1/2 inch holes are drilled into the pipe to allow the roots to enter or moisture to evaporate. 10 to 15 holes are made depending on the length of the ppe.


                                                                                      Step 3
Black nettings is cut in lengths of  1 and a half times longer than the pipe. I then use a screw to fasten the top and base of the pipe.                                                                                                                                                                                                                                                                                                                                                                                                 STEP 4
The net is then wound tightly round the pipe 5 to 7 times and the bottom end with the excess netting is tucked into the end of the pipe.The netting is then  secured with a wire at both ends


STEP 5
I recycle my moss and pack it tightly into the pipe from the top. Make sure that the moss reaches the base without pushing the excess netting out from the base.. I leave about 2 inch space above the pipe and do not fill it with moss to the top 
Once this final step is done, you will be able to mount your orchid on it . I have tried it and the result is really satisfying. The whole pipe is soaked into a solution of fertilizer and the wet moss in the pipe will provide adequate moisture for your plant. As the roots from your plant will seek out damp areas it will eventually go into the holes and the wet moss will provide it with additional water and nutrients.
Stop- using fern roots and start making your PVC pipe for mounting your orchids. It will be cheaper than fern roots.and more satisfying..


Thursday, September 20, 2018

I have a lot of Catasetums in my farm. I sell a lot of Catasetums from my farm and many are still not sure what to do with one that has dropped ones leaves and looks dead. From the series of photographs, the seemingly dead plants which is really "sleeping" will produce new shoots if left alone. For me I will take it out (especially if they have 4-5 bulbs) and cut off all the roots , clean it and tie it individually to a string and hang it upright in a shady place. I normally water it together with my other plants and allow the new shoots to emerge and then replant it when new roots appear. The newly planted plant will be grow bigger and new flower spikes will be longer with more flowers..


Thursday, July 24, 2014

Parent Plants of My Hybrids 3

Parent Plants of My Hybrids 3


This is the third set of photographs showing both parents of my new hybrids

R1001 P Premata Rosmah Mansor x P Jessie Lee


R1002 P Penang Jewel x P Permata Rosmah Mansor


R1003 P Jessie Lee x P Ivy Lee Yong Sin


R1004 P Ang Ai Hue x P cornu-cervi 'Red'


R1005 P Permata Rosmah Mansor x P Poh Ee Huat


R1008 P Permata Rosmah Mansor x P Ang Chee Yang


R1009 P Permata Rosmah Mansor x P Ang Chee Yang


R1010 P Permata Rosmah Mansor x P Robert Ang 


R1011 P Permata Rosmah Mansor sib


R1012 P Ang Ai Hue x P cornu-cervi 'Red'


R1015 P Jessie Ang x P Permata Rosmah Mansor 


R1016 P Permata Rosmah Mansor x P Tan Lee Moy


R1017 P cornu-cervi 'Red' x P bellina '
Blue' 

R1020 P Jessie Lee x P Permata Rosmah Mansor


R1021 P Penang Ruby x P Jessie Lee

 \
R1022 P Tay Kok Chye x P cornu-cervi 'Red'


R1023 P Permata Rosmah Mansor x P Penang Ruby 


R1024 P cornu-cervi' Red' x P Permata Rosmah Mansor


R1028 P Penang Ruby sib


R1030 P Permata Rosmah Mansor sib


R1032  P Zheng Min Etching x P Lee Wai Fun


R1036 P Permata Rosmah Mansor x P Jessie Lee


R1039 P Tay Kok Chye x P Adeline Ang


R1041 P Jessie Lee x P Tay Kok Chye


R1042 P Jessie Lee x P Permata Rosmah M
ansor 

R1042 P Jessie Ang x P Permata Rosmah Mansor


R1047 P Jessie Lee x P Permata Rosmah Mansor


R1048 P cornu-cervi 'Red' x P Permata Rosmah Mansor


R1051 P Permata Rosmah Mansor x P Jessie Ang


R1054 P cornu-cervi 'Red' x P Tan lee Moy


R1055 P cornu-cervi 'Red' x P Hazel Lee


R1058 P cornu-cervi 'Red' x P violacea 'Malaysia'


R1062 P Hazel Lee x P Nanya Chatchom


R1063 P Jessie Lee x P Tay Kok Chye


R1054 P Jessie Lee Sib


R1065 P violacea 'Malaysia' x P cornu-cervi 'Red'


R1067 (Michael Chamorro x Valentinii} x P Permata Rosmah 
Mansor 


R1076 P Dragon Tree Eagle x P Permata Rosmah Mansor 


R1011 P Ang Ai Hue x P Michael Chamorro